


Update December 31st. I'm joining up with Layla at The Lettered Cottage again today for her A Few of My Favorites from 2010: Tutorials Edition. This was my very favorite project of 2010, and according to my stats, it was yours as well, so I'm featuring it again. Hope you enjoy it.
 __________________________________________________________________________
How about some cherries?
How about some cherries?
or peaches, or blueberries, or bananas......
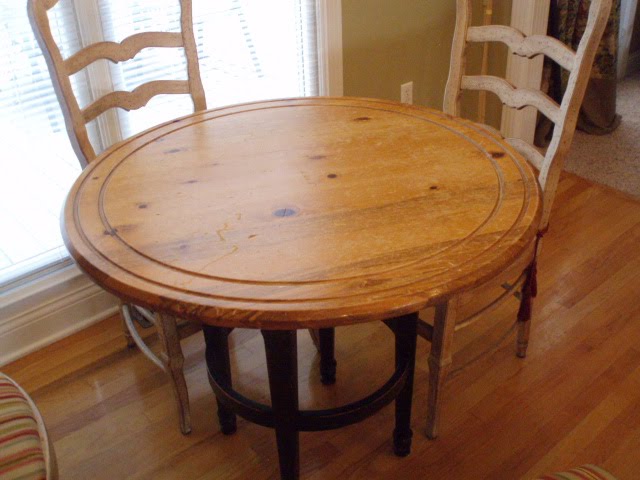
Whatever your pleasure, you can go from this:

to this:

....in just a few easy steps.
You can do this too! Seriously, it was so easy.
the hardest part was waiting for the layers to dry between steps.
A few weeks back I purchased a tablerunner (from Big Lots, believe it or not), that I liked a lot. I really loved the strong colors, and the subject matter. I originally purchased it for my rectangle table I had in the kitchen, but (if you read my blog) you already know that I decided to turn my round coffee table into my kitchen table. When I did that, the runner just wouldn't work for the new table.
I thought maybe I'd cut the runner up and make pillows out of it for the chairs, but then ixnayed that idea.
I then I remembered this:

For those of you that visit Funky Junk Interiors on a regular basis, you know how crazy mad I went for the makeover Donna did on her stairs.
When I looked back over her pictures, I thought 'Hey, I can just paint that runner on the table", and so I did.
Here's How I Did It:
First, decide on your inspiration.
Here's the runner I got mine from.

Take your table outside and sand your base down really good.
I used a palm sander with a 180 grit paper for the initial sanding. Once I was rid of all the sheen, I used a 220 grit paper to smooth
it down.

------------------------------------------------------------
Next, Gather a few supplies:
Inspiration Piece
Palm Sander or Sanding Block
Paints
A few small paint brushes:
Bristled Brushes for the colored stripes
Foam Brushes for the stencils
Painter's Tape
Pencil
Letter Stencils, Stamps, or Chipboard Pieces
Glaze
Clear Polyurethane
Misc drawing props
I used an enlarged clipart picture of cherries I found on the net,
and a small plastic cup to draw the circles for the cherries.
----------------------------------------------------------
Mark off your stripes and begin painting:
TIP: Don't worry about getting the paint too thick or perfect. You'll be sanding it all down again when it's done, and the thinner the paint is in this step, the easier it will be for you then.

TIP: I pull the tape off as soon as I paint all my coats. I find you get a cleaner line if you remove it when the paint is wet.
Let your first stripes dry completely. When they're dry, place the tape for your center stripe on the table.
Next, paint your center color.

Now, I've got the base colors done, and it's starting to take on the look of my runner.

Gather your lettering and stencil supplies.
I somehow forgot to take a picture of the next step, but it's easy-peasy unexplainable.
I used a small checkerboard stencil to paint the little row of blocks along the line at the top.
Then I taped off a small straight line that I painted white.
(Look at the runner, you'll see what I mean)

(Note: I took this picture when I thought I'd be using the large stamps. In the process, I decided I didn't like the type style, so I used some chipboard letters I had for faux stamps for a few of the words.)
Find the centerpoint of your table and mark it.
I used a thumb tack to mark mine so that I could see it easily.
I used this as a guideline throughout the entire process.
Begin applying your words.
To get the arc template for the "Delicious", I used a turkey platter.

(See the row of checks and the white line? that's what I was referring to above.)
Next, I ran a piece of tape to the right of my imaginary center line so that I could play around with my wording to get the proper placement.

I forgot to take a picture when I first started, so you can see that I've already applied the "Cherries".
This is where I ended up using the chipboard letters I had on hand to act as stamps. The only problem with this is that you'll have to fill them in free hand.
When I laid out the letters, I put an ink mark on the tape at the beginning and end of each letter so that I could see exactly where to stamp them.
I painted the backs of the letters and then laid them down on the table. If you have to do it this way, press the letter down so the paint will transfer better.
This is where those of you with Cricuts and Silhouettes would be breezing through this.
And by the way, if you do have one of those, just make a stencil with your words.
You can also use freezer paper to make the stencils.
(If I hadn't been doing this in the late night hours, I would've ran out and bought the right stamps.

Walk away and let the layer of letters dry completely.
When the letters are dry, it's time to start drawing in your fruit picture.
There are a few ways you could do this. I chose to wing it and draw it out semi-freehand. I say 'semi' because I used a cup to draw the guide for my cherries.
Other alternatives: You could make another stencil on your specialty cutter, or, you could print the picture out and then put carbon paper under it and trace the lines of the image. The carbon paper will leave the outline of the image on the table. Just be sure to trace lightly.

Grab your paints and start to fill in the image.
Again, you do not have to be too perfect with this. Remember, you'll be sanding this down, and the glaze you're going to use will cover a multitude of sins.

The clipart picture you see is what I used as a gide for my cherries.


Finally, all of the painting is complete.
Now walk away and let the table dry for about 2 hours.
_________________________________________________________________________
_________________________________________________________________________
NOTE: If you like the look of the table at this point, you can stop and coat it with the poly here and be done with it.
Hubby and I struggled here because he wanted me to leave it as is, but I wanted it to appear aged.
He gave in to me in the end.

Look pretty good, huh? I was in love with at this point already.
________________________________________________________________________
________________________________________________________________________
If you want to proceed with the glaze, then let's move on.
Before you glaze it, be sure to sand it down again. After you sand it, wipe it down with a damp cloth, or tack cloth if you have it on hand.

TIP: If it's really hot outside, you may want to find a place in the house or garage to do the glazing. I did mine outside in 98 degree weather, and it dried on me before I could rub it in, which caused me to have to scrub the glaze off with HOT water. I then moved it into the shade and started over.
Put enough glaze in a bowl to do the table.
Water it down. I used 1 part glaze to 6 parts water. You can see here how much that was.

Start brushing the glaze on.
Work in small sections at a time.
Simply brush it on, and then wipe it off with a towel.
Be careful to leave the glaze color in the areas where it looks most natural.

Finish that process. You're almost done.

Let the table dry for about another 2 hours.
When it's dry, you can start adding your clear coat.
I did 5 coats of the poly. Wait about 20 minutes between each layer.

NOW you're done!
WooHoo!!
It's time to put it in place and start using it!
I went from this:
To this:

And I couldn't be happier!

I'm linking this project up to Funky Junk's Saturday Night Special, and Between Naps on the Porch's Metamorphosis Monday, and Sunday Showcase Party at Under the Table and Dreaming.


Too AWESOME for words!! This absolutely ROCKS! It is gorgeous! I so so SO love it!
ReplyDeleteGREAT JOB!!
Lou Cinda :)
NO WAY! What a great idea to jazz up a table! So great.
ReplyDeleteYou did such a great job on the painting. I love it!
ReplyDelete-Danielle
Wow this is amazing! Love the design, colors and finish! Fantastic job! ~ Stephanie Lynn
ReplyDeleteThat is amazing...so very pretty! I love it!
ReplyDeleteFantastic job!
ReplyDeleteI am so glad that I stopped by tonight!
ReplyDeleteI love the table. And, you make it look so easy!
Thanks!
Rhonda
POLLY! ARE YOUR KIDDING ME!
ReplyDeleteYou and your hub hub did a fantastic job on your table!
I saw you’re before and after shots of your kitchen and, "BRAVO!!!" I kept telling myself, "How in the world did they do their dinning room table??? Where did they buy the table from????" I seriously didn't think you really painted it at all!
"I WANTED YOUR TABLE SO BADLY!!
You got me thinking tonight. I have went AKA dumpster Diving at my next door neighbor's house a few months ago and received a very large square wooden top that looks like you’re dinning table top. It didn't have a bottom to it so I took it and it's now in my kitchen staring at me. So, now I know what to do with the top of it, maybe next week someone might throw away a bottom of some sort and I might be able to grab it. Then, I can make some magic happen!
Melissa
Don't you love Miss Funky Junk! I DO!
That is so darn amazing! Polly you are very talented! I don't know if the rest of us could do that and have it turn out so wonderfully!
ReplyDeleteFantastic!
Cindy
Great job on the table and great tutorial. Very inspiring!
ReplyDeleteI can't believe how great that turned out! I love it with the glaze and sanding. I think it give it the look of an old fruit crate. You did such a great job.
ReplyDeleteThat is so clever. I love your painting. So pretty. Great idea. Hugs, Marty
ReplyDeleteAll I can say is LOVE IT!!! Great job!
ReplyDeleteFantabulous!! I'm so glad you went through all the steps. I didn't think of stamps for the lettering and was wondering how on earth you got them to look so pro!
ReplyDeleteI had a stool with this look painted on it except it was strawberries so this table feels so familiar to me. :)
Amazing project!
Donna
Thank you so much for sharing all the steps. It is a beautiful table and it looks great in your new kitchen.
ReplyDeleteTraci
Polly,
ReplyDeleteI have said it before, but that table is beautiful!!!
Absolutely amazing! Thanks so much for sharing all the steps - you make it look easy! Painting/stenciling/stamping always make me nervous, but I think you've calmed my nerves a bit - lol. I looks so professional!
ReplyDeleteWow!!! I love how much detail you give with your tutorial. I think with this kind of direction, I could do it! I have some end tables that I may just have to give a go. Terrific job Polly!
ReplyDeleteYou did a fabulous job with this, Polly! I was liking it at the 3 colors on the top with nothing else! I love the way you broke it down so that we all can feel like we can do this. I would have been torn myself on whether or not to distress or leave it. I really like it both ways.
ReplyDeleteAMAZING! Thanks so much for showing us how you did this step by step. I am so impressed and inspired!! I just love it and you have to be so happy with how it turned out. Great job!!
ReplyDeleteOh My Gosh! You should be doing flips over the way that turned out. It's amazing. :) You are so talented.
ReplyDeleteThanks for going through all the steps! That table is gorgeous! You can definitely send it my way!!!!!
ReplyDeleteHugs
SueAnn
Oh I love that. You broke that down so I think I could attempt something like that. What an accomplishment. Looks beautiful!
ReplyDeleteBrooke
Thank you SO MUCH for the tut on this! I have a little round wooden side table for my patio that I have been struggling with finishing! I am so gonna try this!
ReplyDeleteLOVE your color, ps!
This looks fabulous! Good job and thanks for the great inspiration!!!
ReplyDeleteI love it!
ReplyDeleteWhat a great tutorial, Polly. You made it seem so easy. I think I would have trouble with the cherries, but the rest I would try. Great table for your space too. Thanks for the inspiration.
ReplyDeleteGiveaway on my blog today!!
AMAZING! absolutely LOVE it!
ReplyDeleteLove it! Great colors too!
ReplyDeleteFABYOULOUS ... and your tutorial is wonderful too.
ReplyDeleteI saw that runner and thought about making a purse out of it but umm...got enough on my plate.
LOVE that you painted the table.
Absolutely FANTASTIC!!!
ReplyDeleteHand clappin', hi fivin', foot stompin', kick my heels up and squeal - beautiful!!!!!
ReplyDeleteI learned SO much reading this....I'm not as scared as I used to be to do glaze!!! Thank you SO much. Once again!
~Kolein
This is a fabulous makeover! I love the distressing and the image is great. You did an awesome job painting it!!
ReplyDeleteOh!!! I LOVE this soooooo much! What a wonderful end result and thanks for the great tutorial!!!
ReplyDeleteFantastic! What a great job!
ReplyDeletePolly it is absolutely amazing. Thank you so much for walking us through each step. I feel like I could even tackle this project! I think in the fall I am going to try it on a smaller scale with a table I have on my patio.
ReplyDelete~ Tracy
i am thoroughly impressed with your talent, but also with your patience! it looks amazing and was worth all the time and effort. fantastic!
ReplyDeleteWow. That table is amazing. I have some very similar pictures on the wall of my dining area, so I was drawn to this project. You are very talented!
ReplyDeleteAmazing! How totally creative you are! Jackie
ReplyDeleteThis is truly one of the cutest makeovers I have ever seen! You should be so proud of yourself!!!
ReplyDeleteHi Polly. Just wanted to let you know I featured this today. Thanks so much for joining the Sunday Showcase Party! Hope you have a great week! ~ Stephanie Lynn
ReplyDeleteThat table is beautiful! Amazing job! I'll be featuring this on my lazy Sunday post!
ReplyDeleteSam
Mom.Undecided.
http://momundecided.blogspot.com/
All I can say is WOW, how inspirational and eye popping... Between Stephanie and you, I am definatly picking up my paints again..... Thanks for the inspiration....
ReplyDeleteThis is the cutest thing I have ever seen! I want one! The colors and the whole disign would be perfect in my home!
ReplyDeleteWhat a clever girl you are! I wonder how many people are going to copy this design;)?
Love love love!
Cathy
I loooooooooooooove it!
ReplyDeleteYour table is fabulous! What a wonderful job...love it.
ReplyDeleteThis is amazing I love it! I was at BL yesterday and saw placemats with this design and went GaGa over them too. Your a geneus!
ReplyDelete~ ~Ahrisha~ ~
That's just amazing!
ReplyDeleteOh my goodness! WONDERFUL!!! I just became a Follower AND am subscribing. I will have to come back and look at your older posts. YOU are one talented, creative girl!!!!!!!!!!!!
ReplyDeleteBest regards,
Gloria
This is so fantastic. My kitchen curtain are the same as your seats! And the walls are in granny apple green. I need this table to seat six!
ReplyDeleteI love this blog!
You are one talented gal...Love your blog...Enjoying some blog hopping Hope you will stop by...I have some great giveaways on my holiday blog and a special post on Grammy Girlfriend.
ReplyDeleteHi Polly, I'm just now seeing this awesome tutorial. Your table is beyond fantastic.
ReplyDeleteum...wow. You rock!
ReplyDeleteOMG that table is just divine!! You did a wonderful job!! I just love it. In the inspiration file it goes.
ReplyDeleteI'm a little late to the party here, but I just stumbled across this today. Love it! I just wanted to stop by and let you know that I linked to this post today from the Home & Garden channel at Craft Gossip. :)
ReplyDeleteYour feature will appear in the main Craft Gossip RSS feed, on the main home page and can be found directly here
http://homeandgarden.craftgossip.com/vintage-look-cherry-label-table/
If you would like a "featured by" button, you can grab one here!
http://homeandgarden.craftgossip.com/grab-a-craft-gossip-button/
too too too cute!!!!!
ReplyDeleteblessings
barbara jean
completely, entirely amazing!
ReplyDeleteyou are so inspirational! I love it!
I just found your blog....WONDERFUL!!! Great tutorial...thanks so much!
ReplyDeleteLisa
This is fantastic Polly! I just love it! The colors are great and so are the graphics.
ReplyDeleteThis is FABULOUS!!!
ReplyDeleteLove the techniques and your tutorial and instructions....FABULOUS POST...thanks so much for sharing it with us all.
Jann